Friday, September 30, 2011

Week 5 {Self-Decorated Bulletin Board}

I know, I know.
Its been like 700 weeks since my last post. 
Not literally, but still, its been a while.
But, its been busy. 
And its been fun.
And I'm here to tell ya that I've got another tutorial for you.
Its called the Self-Decorated Bulletin Board.
And, to be honest, its one of my favorites.
So, be prepared to have your socks knocked off your feet!


Materials:

- A Bulletin Board (the size doesn't really matter,
just make sure you have enough paper to cover it!)
- Scrapbook paper (cute, coordinating paper is always best ;)
- Mod Podge

Optional:

- Sanding Paper
- Paint 
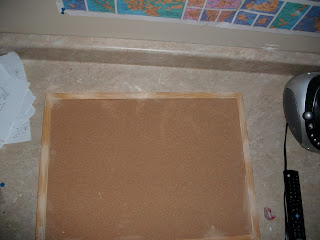
*Ignore the fabric and buttons I have on there....


Step 1.
If you are going to paint the edge of your bulletin board,
you may want to consider sanding it.
It gives it a more "vintaged" feel.
Which we love, of course.
What I did with mine was to find certain points
That I wanted to create imperfections...
and sanded them.
I made little divets in the wood until
I got it looking how I liked it.


Step 2.  Pant the frame.
In order to get a more personalized look and color, try mixing
paint to create your own color.
This color is a mix of dark brown, red, and light brown.
(paint after wiping off the dust from sanding of course)


 Step 3. Lay out your papers and then mod podge.
There really is no right or wrong way to do this,
but there are a few tips.
When you're laying them out, I suggest making them fit
around the bulletin board, so you don't have to cut any
hanging edges.
This meands tucking papers under if you must.
Once you have your papers all laid out, start mod-podging!
Start with one paper at a time, and try applying mod podge directly to the paper.
If that doesn't work, then add it to the board itself instead.


Step 4. Let dry and enjoy!
Bulletin boards are especially fun for hanging notes, pictures, etc. on..
Personalize it as you wish, and most importantly.......
Have fun with your ridiculously easy self- decorated
bulletin board!


Tuesday, July 19, 2011

Week 4 {using flowers on cards and how to make the swirly ones}

I have found no better tutorial on the web than this one.  And there is no way that I could explain it better.  
If you have not checked out littlebirdiesecrets.com, its a must read.

I like to use them on cards as a centerpiece.  Try experimenting around with them, you never know what you'll come up with!  Cards are fun because they always turn out different - no two cards are the same!

Friday, July 1, 2011

Week 3 {Paper flowers with inked edges}

Okay, so I'm a little behind.  But that's okay, because I promise to do better.

Here's the tutorial for week 3:

Materials:
Buttons
(patterned or not) paper
Ink pad
Hot glue gun


For the flowers, I have a tutorial on how to make torn paper flowers.  Go to my blog, and click on 'older posts' a few times, you should see it pop up.

Now for the inking part.  Make sure to roll up  your sleeves because you will probably get ink on you.
Cut out your individual circles, and ink them one by one. You can either use a sponge dipped in an ink pad, or rub the circles on the ink pad by themselves. 


Tips:
There is no certain method to doing this, just keep going until it looks right.
Try not to go too crazy with it -- a little ink on the edges seems to work just great.
When you get to this point, DO NOT PUT YOUR FLOWER TOGETHER.  The ink will rub off and get all over your fingers.
I recommend letting them dry overnight, and in the morning, assemble your flower to your hearts content.
Enjoy!


*I did not take these pictures -- they were taken from blogs on the web.

Friday, June 17, 2011

Week 2 {how to dry flowers so they retain their color}

Week two is here!  A little bit late, but better late than never, right?!


So here are the materials that you will be needing.....
1. A ribbon that is long enough and sturdy enough to tie around your flowers and hang them up
2. A push-pin
3. A dark room
4. Flowers of course!


Steps:
1. Gather your flowers when they are starting to die a bit... that way you can still enjoy them while they are living!
2. Tie your ribbon around the bottom of the stems of the flowers - tight so they don't come out!
3. Take your flowers into a dark room and pin the ribbon and flowers to the wall - upside down
4. Wait a couple weeks, checking on them often.  When they are completely dry, remove them from the dark room and enjoy!


Monday, June 6, 2011

Week 1 {Binder Page Cover Tutorial}

Hey Y'all!
I'm back.  Like I promised.  It's Week 1 and I'm doing good.
Week one is the binder page cover tutorial.  I recently made one for a church calling, but you can make one for other things such as school, and just to organize.

Here are the supplies that you will be needing:
  1. A binder with a clear covering (so that you can see the page when you slip it in)
  2. Some scrapbook paper of your choice (preferably to match whatever you are making it for)
  3. A flower for embellishment (Stay tuned for a tutorial later on how to make inked flowers)
Now... Lets get started!
The first thing that you need to do is layer your scrapbook paper according to your liking.  Make sure that you measure how big your binder is so that the page cover can easily slip into it, but is not  too small.


Once you have your paper cut, you need to lay it out so it looks good.

Lay it out something like this so it creates a look of symmetry.


After that, glue it together (I would recommend using a glue stick and stacking books on it as it dries or rubber cement), and stand back to admire your work!


Come back next week and I promise I will have tutorial number two ready -- so get out your flowers and be ready to dry them!

Saturday, June 4, 2011

Looking Forward {Summer Crafting Bug}

I confess.  I've been WAY too far behind on my blog.  And now I'm hear to make it up to you.
School's out and the summer is here!  That means more time, warmer weather, and more "camera moments".
I promise that I will give you at least a post a week - and I'll start now by giving you a sneak peak for what's to come......

Week #1 - Binder Page Cover (perfect for Church callings, school, and organizing!)

Week #2 - (I'm sorry this is a horrible picture on my part) Dried flowers that retain their color

Week #3 - Inked Edges on Flowers (gives it a more "vintaged" feel)

Week #4 - Using flowers on Cards and how to make the swirly ones

Week #5 - Self- decorated Bulletin Board (my personal favorite)

Week #6 - spruced up agenda cover

Week #7 - Ruffled Flowers Tutorial

 Week #8 - Editing Photos to your Heart's Content

Whew!  Looks like I've got a project ahead of me - Come back next week, and I PROMISE that I'll have tutorial number one waiting for ya!

Tuesday, April 12, 2011

Card Making Tip {Recap}

Okay, so, I'm sorry for any confusion......

Just to clarify,


You CAN use different patterns on cards, just use your judgment.  I trust you.

Heck, look at how many patterns are hear?

And its still cute!


Also, just in case you were wondering, there is not a part three... I will be fixing that soon :), but in the meantime... I think you can figure out how to put a card together, right?


Ha ha thanks for tuning back in.... hope I saved y'all some confusion!

Monday, March 21, 2011

Card Making Tip {Part Two}

I know that you all have been just crazy waiting for me to post the next part to the three part tutorial...  Sorry I didn't get it in when I said I would, but, hey, better late than never!

Part two of this tutorial is all about using patterns in cards.  So, by now, you have picked out your colors, and are ready to use them, right?  Well, almost right.  You have your colors picked out, but now you need to organize your patterns, because if you have too many patterns, they will clash, and you will end up with an ugly mess.

First thing you need to look at when choosing patterns, is choosing your base color, which will most likely be the one that does not have a pattern at all, or doesn't have a large pattern, but you can still make a cute card with your main paper that has a pattern.  Let's start with one that does NOT have a pattern to it.

Step 1:  Choose your base color
Let's say that I am using this lovely teal color.


Don't you just love how it is double-sided?  It makes a wonderful inside.


Step 2:  Once you have chosen your color of paper, fold it as you would a card to figure out about what dimensions you are going to use, and slice it to those dimensions with a paper cutter.


Step 3:  Choose a piece of interest to put on your card, such as a flower {see my torn paper flower tutorial}, a stripe of another paper, polka dots, etc.  For this particular card, I chose to use TWO different stripes.  See how I laid them out?

Keep laying things out until you get the desired effect.  Have fun!


A Few Things You Should Know {My Life}

Yes.  I know.

This is not part 2 of the card making tutorial.  But you know what?  It's coming.  Later.

I recently decided, that if you are going to follow this blog, you should know why it was started, and who started it!  Wouldn't you agree?

A few things you should know about moi:

1. I go through phases of obsession.  One day its cards, and the next day it's flowers.  But heck, who really cares?

2. I not only love to craft, but my secret that you should know, is that I also love to write.  Yes, that means English is my favorite subject, and no, I am not a nerd.

3.   I love to make lists.  I don't know why.  Some crazy obsession of my mothers, probably.

4.  Apparently I have an accent, but I don't hear it...

5.  I love flowers.  I don't know why, but it's something strange that I like, such as how simple things intrigue me.

6.  I can never stay with one thing.  Such as this blogs many many backgrounds.  Sorry that I change them so often:)

7.  I play not one, but two instruments.

8.  It bothers me so bad if the blinds are closed during the daytime.

9.  I love to make lists (hence this list)

10.  When there is an awkward silence, and I don't know what to do, I  laugh, just to fill in the silence.


Well, that's me.  I have plenty more quirks about me...  I'm sure you do too!  Leave a comment so I can get to know you better, too!

Tuesday, March 1, 2011

Card Making Tip

Hey y'all!  Sorry I haven't posted in a while....  Things have been pretty busy for me!  Well, I decided that an easy (but all important) tip for me to post would be a design tip.

This tip will be about choosing the right colors for your card.  Come back later for more tips on how to organize, cut, and assemble your card.  

I know how the story goes.   You go to look in your bin of scrap booking paper, and you decide that you don't want to pull everything out, because it will be nearly impossible to get it all back in, right?  Well, it's probably like that if you are a person like me. :)  I'm here to tell you that it's okay, you CAN dig through your drawers, because the end result will be worth it.  

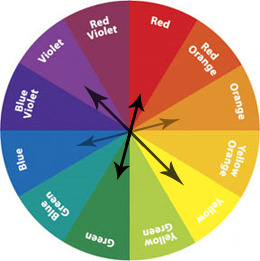
A good basis for color combinations would be to consult a color wheel.  All you artists out there are probably familiar with one of these.  But if not, never fear, here's your introduction.  A color wheel consists of three different types of colors; primary, secondary, and complementary.  Although you can go deeper into a color wheel, we're just going to look at these three.  

Primary colors are the colors that all of the other colors are made of.  These colors are: blue, red and yellow. You mix red with yellow you get orange, you mix blue with yellow you get green, and so on.  The colors that these three make are: green, purple and orange.  These are called secondary colors.  Complementary colors are simply colors that are opposite each other on the color wheel.  They compliment each other, hence the name.  Complement colors are: orange/blue, purple/yellow, red/green, and all of the colors in between.


Sorry if you can't tell by looking at this.... but the complementary colors are colors OPPOSITE of each other on the color wheel, just as I stated.  You can use this as your base, but it's not entirely necessary to create good color combos.  Just a suggestion.  Another suggestion of colors would be to pick a neutral color, such as black, tan or grey, and pair it with a more vibrant color such as yellow, red or purple.  

For a card, I would choose about three colors, although you can use more or less, depending on how much you want, or what looks good.  I would suggest choosing one neutral, and one-two complementary colors, or just one color to use as a pop with the neutral.  Come back tomorrow for another tip on how to use patterns with cards!

Tuesday, February 22, 2011

How To Make Your Own Scrapbook Paper (amazing, I know)

Well, as soon as you looked at this post, I bet you're wondering yourself crazy just thinking about how I could POSSIBLY do this, and still make it look cute?  Well, here's your answer.

Over the past few months or so, I have discovered a cheap way to make your own designs, and still make them look cute.

Materials:
  • Cardstock or regular printer paper (this just depends on how sturdy you want your paper to be, and what you are using it for)
  • A theme or inspiration of your choice (love, friendship, etc.) 
  • Different quotes about your theme

How to do it?
  1. Get on your computer, and open up word or another processor system
  2. Open another tab and look up a list of several quotes, or sayings about your theme, and copy what you are going to use.  If you are having trouble finding quotes, here is a link that will take you to a good website:  http://www.quotesandpoem.com/quotes/listsubjects/, or you could always think of some on your own (which might be interesting, but go ahead, give it a shot!)
  3. Paste your quotes on Word, and change the font and size to your liking.  You may want to change the layout of the page to justify or page fill.
  4. Print out your quotes on the paper of your choice
  5. Enjoy your ridiculously awesome homemade scrapbook paper!! 


Monday, February 21, 2011

Torn Flower Tutorial

Time for another tutorial!  This one comes from another crafting website called littlebirdiesecrets.com.


1. Select a piece of your favorite paper.  (It can be plain or patterned, it doesn't really matter)


2. Draw three or four circles on your piece of paper, all different sizes, ranging from large to small, etc.  Make sure that you draw your circles on the OPPOSITE side of paper that you want showing, that way you don't have to worry about pencil marks.

3. Rip out around the edges of your drawn circles, and crumple them up.  You can spray a bit of water on them if you want to get them to crumple more.


4. Layer layers from largest to smallest, and hot glue together, adding a button of your choice!

5.  If desired, add ink to the edges to give it a more "vintage" look.

6.  Enjoy your flowers!  Make sure that you make enough of them to go around!


An Intro To Shabby Blogs

The other day my friend told me about a website called shabbybogs.com.  It is my new best friend!  For those of you who DON'T know what shabby blogs is all about, you should take a trip down there and see for yourself!  It's a website for all things "shabby".  It has buttons, backgrounds, stickers, blinkies, and everything imaginable for your blog! I've decided that all of shabby blogs wonderfulness should be shared with you, so here's a tutorial on how to add backgrounds to your blog!

Step 1.  Go to Shabbyblogs.com, and click on the designs button at the top of the page

Step 2.  Once your there, click on the button that says "backgrounds"

Step 3.  Scroll through the pages and click on your favorite background

Step 4.  Copy the code in the box, and click on the design or layout button on your blog

Step 5.  Once there, click on "add a gadget", and scroll through the list until you find HTML/Java Script

Step 6.  Paste the code in the box and click on "Save"

Step 7.  Enjoy your shabby blog!

Saturday, February 19, 2011

New Beginnings!

One day a girl who is totally in love with crafting and everything about it, decided that she was going to make a blog, that is totally dedicated to crafting and everything about it. And guess what? You've found it! allthingsvintaged.blogspot.com is a crafting website dedicated to craftiness and creativity. It is a blog that lets me share all of my ideas with you, and in return, hopefully get some ideas back!

A little about myself: I live in Utah. I have found time to make crafts inside, read fabulous crafting blogs, take nature walks to get the inspiration flowing, and have written them all down, just for you! I have decided to try and post something new (nearly) every day of the week, in hopes that my little blog will make its way onto your list of every day must-read blogs!

So that's me. Thanks for taking your time to mosy on over here to my blog, and if your friends ask you where you've been getting YOUR inspiration from, tell them they'll have to go check out allthingsvintaged.blogspot.com!