Friday, June 17, 2011

Week 2 {how to dry flowers so they retain their color}

Week two is here!  A little bit late, but better late than never, right?!


So here are the materials that you will be needing.....
1. A ribbon that is long enough and sturdy enough to tie around your flowers and hang them up
2. A push-pin
3. A dark room
4. Flowers of course!


Steps:
1. Gather your flowers when they are starting to die a bit... that way you can still enjoy them while they are living!
2. Tie your ribbon around the bottom of the stems of the flowers - tight so they don't come out!
3. Take your flowers into a dark room and pin the ribbon and flowers to the wall - upside down
4. Wait a couple weeks, checking on them often.  When they are completely dry, remove them from the dark room and enjoy!


Monday, June 6, 2011

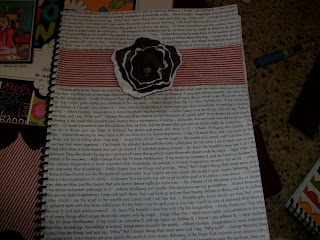
Week 1 {Binder Page Cover Tutorial}

Hey Y'all!
I'm back.  Like I promised.  It's Week 1 and I'm doing good.
Week one is the binder page cover tutorial.  I recently made one for a church calling, but you can make one for other things such as school, and just to organize.

Here are the supplies that you will be needing:
  1. A binder with a clear covering (so that you can see the page when you slip it in)
  2. Some scrapbook paper of your choice (preferably to match whatever you are making it for)
  3. A flower for embellishment (Stay tuned for a tutorial later on how to make inked flowers)
Now... Lets get started!
The first thing that you need to do is layer your scrapbook paper according to your liking.  Make sure that you measure how big your binder is so that the page cover can easily slip into it, but is not  too small.


Once you have your paper cut, you need to lay it out so it looks good.

Lay it out something like this so it creates a look of symmetry.


After that, glue it together (I would recommend using a glue stick and stacking books on it as it dries or rubber cement), and stand back to admire your work!


Come back next week and I promise I will have tutorial number two ready -- so get out your flowers and be ready to dry them!

Saturday, June 4, 2011

Looking Forward {Summer Crafting Bug}

I confess.  I've been WAY too far behind on my blog.  And now I'm hear to make it up to you.
School's out and the summer is here!  That means more time, warmer weather, and more "camera moments".
I promise that I will give you at least a post a week - and I'll start now by giving you a sneak peak for what's to come......

Week #1 - Binder Page Cover (perfect for Church callings, school, and organizing!)

Week #2 - (I'm sorry this is a horrible picture on my part) Dried flowers that retain their color

Week #3 - Inked Edges on Flowers (gives it a more "vintaged" feel)

Week #4 - Using flowers on Cards and how to make the swirly ones

Week #5 - Self- decorated Bulletin Board (my personal favorite)

Week #6 - spruced up agenda cover

Week #7 - Ruffled Flowers Tutorial

 Week #8 - Editing Photos to your Heart's Content

Whew!  Looks like I've got a project ahead of me - Come back next week, and I PROMISE that I'll have tutorial number one waiting for ya!